Creating and managing Profiles
Create a Profile and choose its basic and Advanced Settings first. Then add fields and choose their settings. Most settings apply only to particular uses, so you can skip settings that do not apply to your Profile.
Create a Profile
- Go to Administer > Customize Data and Screens > Profiles and click Add Profile.
- Set Profile Name to a meaningful name.
- For Used For, choose from Standalone Form or Directory; Search Views; Drupal User Registration; and View/Edit Drupal User Account. You can check more than one box. Checking Search Views limits your field choices to Contact and Contact type records only.
- Set Order if needed. Lower numbers place Profiles before higher numbers when a page includes more than one Profile. The field is filled in automatically when a Profile is created.
- Use Pre-form Help and Post-form Help for guidance that appears before or after the Profile.
- Leave Is this CiviCRM Profile Active? checked to make the Profile available for insertion into forms and for the Batch Update function. It is checked automatically. To take a Profile out of use later, edit it and uncheck the box.
Advanced settings
Click the gray advanced settings bar to show these fields. Not every setting applies to every Profile.
Limit listings to a specific group
This setting matters when a Profile displays information on your website, such as in a searchable membership directory.
- Select the Group whose information you want to make publicly viewable or searchable. For a directory of active members, for example, create a Smart Group of members with a status of New, Current, or Grace.
- Choose that Smart Group in this field. Smart groups are dynamic: when new memberships are added, the corresponding contact will automatically be included in the directory.
- If you do not choose a Group, CiviCRM will, by default, allow a search to expose every record in your database. In most cases, you will not want website visitors to see who is in the whole database.
Add new contacts to a group
Any new contacts who fill out the Profile will be added to the selected Group. For example, people who complete a volunteer sign-up form could be added to a Volunteers Group.
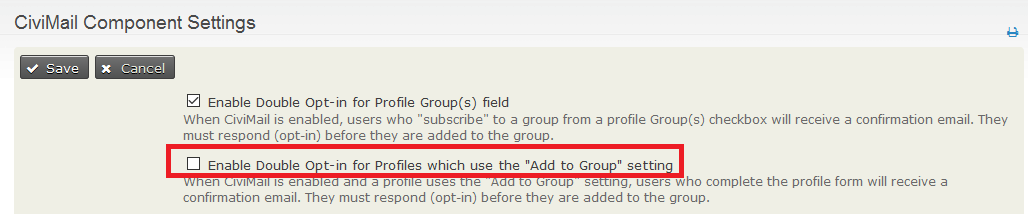
By default, contacts receive no confirmation that they have been added to the group and are not asked to validate their email address. To send an email to contacts who complete the form, go to Administer >> CiviMail >> CiviMail Component Settings and check "Enable Double Opt-in for Profiles which use the "Add to Group" setting". Contacts must respond (opt-in) before they are added to the group.
If you want to offer more than one group, consider using the groups profile field.
Notify when profile form is submitted
For a Profile used as a sign-up form, enter an email address to receive a notification whenever the form is submitted. For example, a volunteer coordinator could receive an email for each volunteer sign-up. Separate multiple addresses with commas.
Redirect URL
For a standalone Profile form, Redirect URL sends people to a specified web page after submission, such as a thank-you page. It does not apply when the Profile is embedded in an event sign-up or contribution form. If left blank, people are directed to a page displaying the information they entered.
Cancel redirect URL
This works like Redirect URL but applies when people cancel their form submission.
Include reCAPTCHA?
This applies when anonymous users fill in Profiles. CAPTCHA is spam-blocking software that asks a visitor to enter text displayed in a graphic, preventing automated web-crawling spiders from completing the form. The source highly recommends including it.
To use this feature, set up a free reCAPTCHA account and enter configuration information in CiviCRM. Go to Administer > Customize Data and Screens > reCAPTCHA Settings; that page includes sign-up instructions.
Drupal user account registration option
For Profiles used on public pages, this setting determines whether people can or must sign up for a website account in addition to submitting the form. It can be used when people become members or register for an event.
WordPress user account registration option
WordPress also allows CiviCRM Profiles to create accounts as described above. Within WordPress Settings > General, "Membership [ ] Anyone can register" must be clicked.
What to do upon duplicate match
For Profiles used on public pages, this setting controls what happens when submitted contact data matches an existing record. You must choose an option; "Issue warning and do not save" is the default. Profile matching uses the Unsupervised deduplication rule. See Deduping and Merging in Working with Your Data for more about deduplication rules. If multiple contacts match, the first matching record is used.
- "Issue warning and do not save" is ignored when a Profile is embedded in an online contribution, membership sign-up, or event registration form. In those cases, the transaction is linked to the matching contact. Otherwise, the user sees a message that a record already exists and cannot submit the form.
- "Update the matching contact" adds new form information to the contact record and overwrites existing values in fields included on the form. For example, an address entered on the form replaces the address already in the database.
- "Allow duplicate contact to be created" creates a new contact for every submitted form, regardless of potential matches. All submissions are saved without overwriting data, but duplicate records may need to be deduped later. See Deduping and Merging in Working with Your Data.
Proximity search
For a searchable directory, this adds a search block with a start address and a search radius. Choose None if it is irrelevant, Optional to offer it, or Required to make users enter both values.
Enable mapping for this profile?
For a searchable directory, this adds a map to the search results.
Include profile edit links in search results?
For a searchable directory, this adds a link in results listings to edit Profile fields in the returned contact records. Only users with permission to edit those contacts see the link.
Include Drupal user account information links in search results?
For a searchable directory, this adds a link to a resulting contact’s Drupal user account information, such as their My Account page. The link appears only for contacts who have a website user account.
After saving the Profile settings, add its fields. If the form will use custom fields, make sure they have already been created.
Add fields and choose field settings
Not every field setting applies to every use of a Profile.
- Click Add Field.
- For Field Name, choose the record type from the - select - dropdown, then choose the field from the secondary dropdown.
- For Field Label, use the prefilled default or rewrite it for your audience. For example, you might rename Postal Code to Zip Code. This label appears wherever the Profile is used.
- Check Required? to require the field whenever the Profile is used—for example, to require First Name, Last Name, or Email in a form submission. This is not relevant to Search Views usages [known as Search Results in 4.1 and previous].
- Check View Only? to let users view but not edit the field. Fields marked View Only are not included when the Profile exposes search results. This setting is not relevant when the Profile is used only to collect information.
- Set Visibility according to the Profile’s use:
- For a searchable directory, set fields you want on the search form to Public Pages or Public Pages and Listings.
- For sign-up forms, use User and User Admin only, so other visitors to the form cannot view database data.
- For Search Views, use Public Pages or Public Pages and Listings.
Either Public Page choice reveals two more settings: - Searchable? applies only to searchable directories. Check it to include the field on the search form. - Results Column? applies only to Search Views (known as Search Results in 4.1 and previous). Check it or the field will not appear in the Search View.
- Use Field Pre Help and Field Post Help to guide people completing forms. Field pre help appears inline. Field post help will create a small speech bubble which when clicked appear in yellow.
- Use Order to control the order of fields in the Profile. Lower numbers appear first.
- Leave Active? checked so the field appears when the Profile is used.
- Click Save and New to add another field, or Save when you are finished.
Manage existing Profiles
View and edit Profiles at Administer > Customize Data and Screens > Profiles. Use Fields to add fields or edit field settings, and Settings to change Profile settings. Under more, you can see how Profiles will appear, obtain links and embed code, or copy a Profile as the basis for another.