Set up and manage Personal Campaign Pages
Set-up
All Personal Campaign Pages must be linked to an existing online contribution page or event, created in CiviCRM by navigating to either: Contributions > New Contribution Page or Events > New Event. Once a contribution page or event has been generated, while editing the settings go to the Personal Campaigns tab and click 'enable personal campaign pages'. A number of other options may then be configured, including:
- Approval Required: check this option to moderate all PCP creation requests. An administrator must approve the page before it becomes active, at which point the user will be notified via email, and may proceed to promote it (ensure "notify email" is also used to notify an administrator when PCP pages are awaiting review).
- Notification Email: Each time a new PCP is created, an email will be sent to the named administrators (separate multiple email addresses with commas).
- Supporter Profile: select a profile of fields to be collected from the user creating the PCP.
- Owner Email Notification: an email can be automatically sent to the PCP owner whenever a donation is made through their page. You can select whether emails will always or never be sent automatically for all PCP pages created under that particular event or contribution page. Alternatively, you can allow the PCP owner to choose during the page set up process whether or not they would like to receive notification of donations made through their page.
- Allow 'tell a friend' functionality: the PCP owner may send emails to their contacts, encouraging them to visit their page and contribute.
- Campaign Type: when enabling PCPs for an event, you may give the event registrant the option to either create a fundraising event of their own, or a contribution page (e.g. to raise money in support of their attendance).
After PCP creation has been enabled, there are two ways to create a PCP:
- An individual donating to a contribution page or registering for an event is given the option to build their own PCP via a button on the 'thank you' page.
- If the individual forgets to click the link upon donation, or you wish to give all visitors the opportunity to create a PCP without the prerequisite of donating or registering themselves, you can give your constituents a direct link. This link could be emailed to the constituent, embedded in a page or added as a menu item. Note that.
The invitation button:
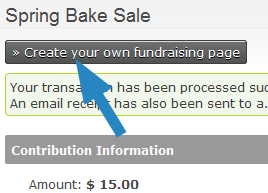
The invitation link:
http://<EXAMPLE.ORG>/civicrm/contribute/campaign?action=add&reset=1&pageId=<CONTRIBUTION_OR_EVENT_ID>&component=<EVENT_OR_CONTRIBUTE>
To use this link, replace the following:
- *YOUR-SITE.ORG*: enter your domain's address.
- *CONTRIBUTION_OR_EVENT_ID*: give the ID number of the event or contribution page. This can be obtained through navigating to 'Manage Events' or 'Manage Contribution Pages' and looking for the ID against the item in question.
- *EVENT_OR_CONTRIBUTE*: If the invitation is for a Personal Campaign Page in support of a contribution page, use component=contribute. If the invitation is in support of an event, use component=event.
Managing Personal Campaign Pages
When an individual has clicked the 'create your own fundraising page' button or a direct link, they will be presented with a form to fill out their information, including: a title, message, monetary goal amount and text for the donate button. They may also attach a photo, enable a progress - thermometer style - bar, include an honor role of their donors who have not elected to be anonymous, and whether the campaign is active (they may choose to activate it at a later time).
If PCP moderation has been enabled (the 'approval required' option), an administrator must log into the CiviCRM back-end and enable the page at Contributions > Personal Campaign Pages before the individual is able to use it. Simply seek the PCP in the list, look toward the end of the row and click 'Approve', 'Reject' or 'Delete' (at a later date, you may also enable/disable the PCP by clicking the 'More' link). The individual will be sent a confirmation email, and may proceed to use it. Ensure administrators are always alerted to this step by entering a notification email address in the contribution page settings (see 'Set-up' above).
Finally, following approval the PCP owner will be sent an email outlining how they may begin promoting their page and editing it, providing they have been given user access. The user and administrator can edit the PCP settings at any time through the menu item: Contributions > Personal Campaign Pages> click Edit, Delete or Disable/Enable.